When I first thought about adding kayak fishing as an extension to my shore fishing frankly, I did not have a clue. I had never been on a kayak before let alone fish from one. The first thing I did was hire kayak for a couple of hours and armed with a fishing rod and some Mackerel feathers set out just to get a feel of what it might be like. The kayak was an Ocean Frenzy and although it was fun and I enjoyed the trip, it was soon clear to me that if I wanted to do some serious kayak fishing I needed a purpose built fishing kayak rather than a general touring kayak such as the Frenzy.
After a great deal of research on the Internet using kayak fishing blogs and You Tube thus, picking the brains of others that had been there and done it, along with sourcing various kayak equipment suppliers the following is my current set up.

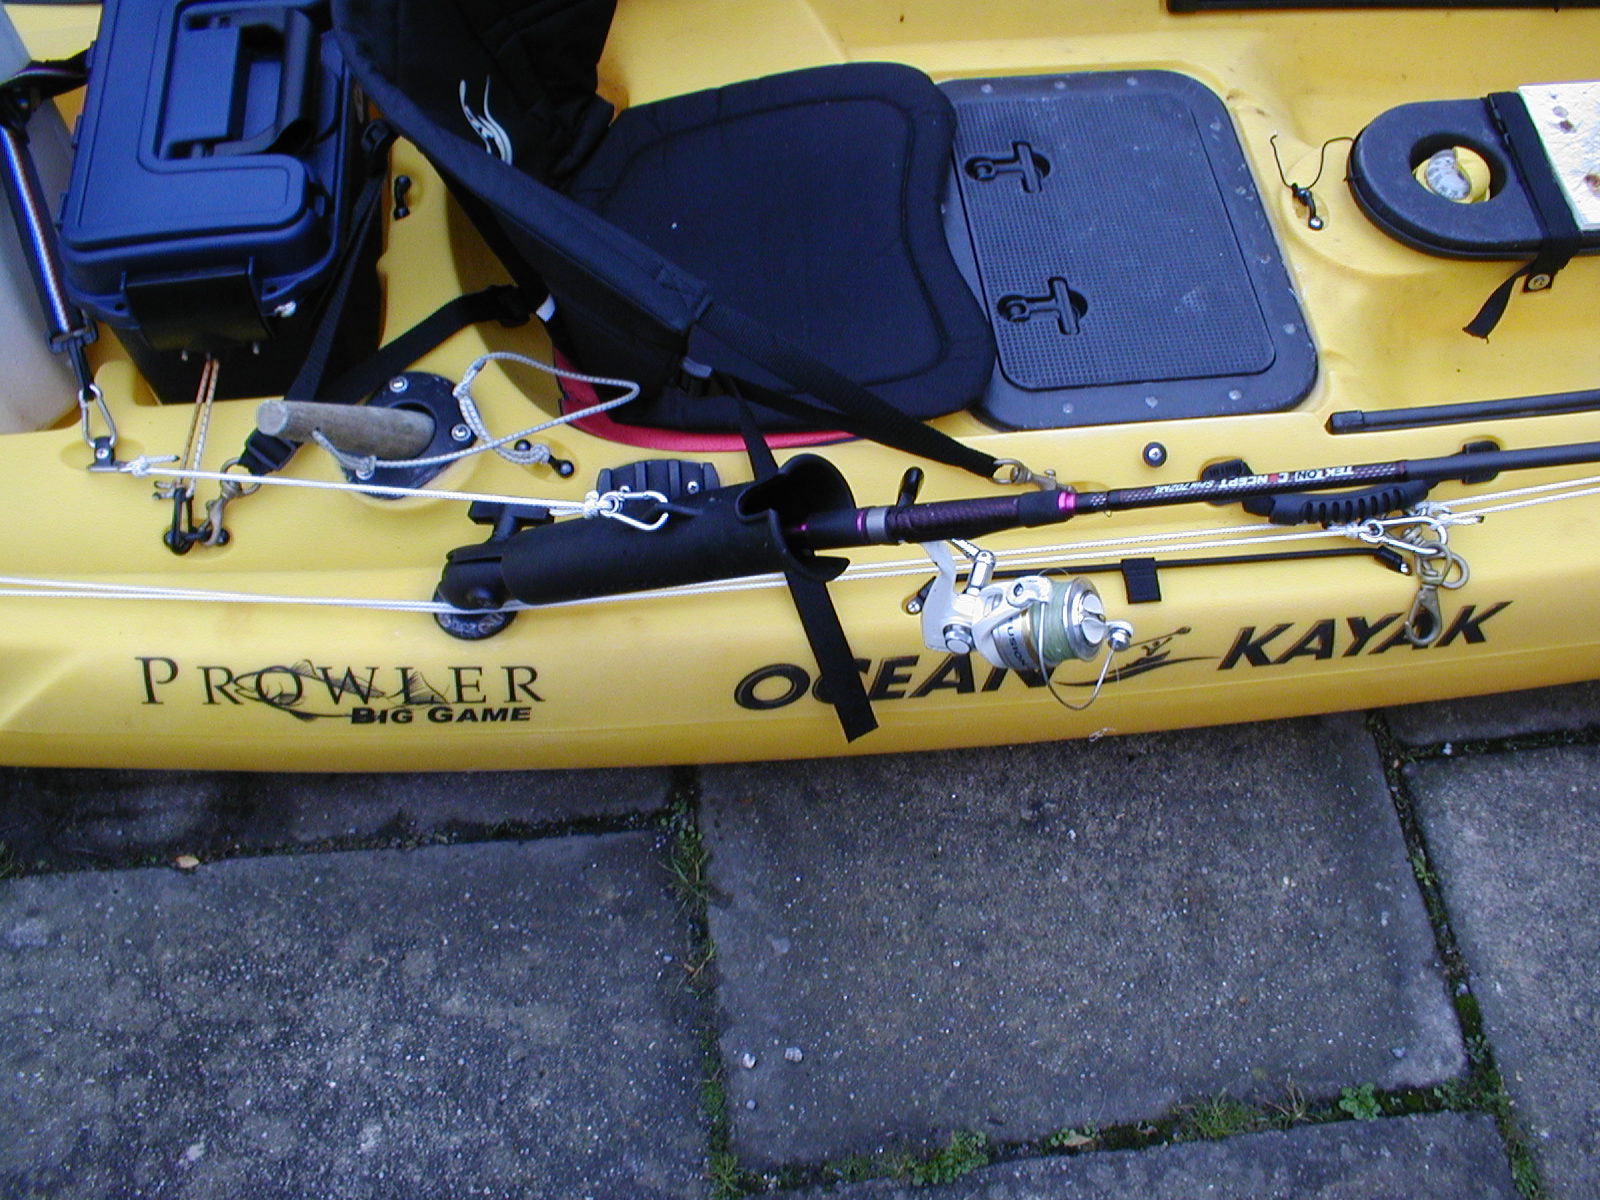
The kayak is an Ocean Prowler Big Game Angler. I chose this kayak because of its stability and storage facilities. It has a wide platform with a flat surface along the sides, which is ideal for mounting rod holders. It has plenty of legroom and at 6' 3" that was important to me.
Working from stern to bow the white container is used as a dry box and is fixed with upright rod holders. This idea came from another blog and what a great idea it has proven to be. The container is a watertight pet food container purchased from Amazon. I use this to store anything that I want to keep dry. I believe it can also be converted for use as a live well however, as I am not interested in fishing with live bait its sole purpose is as a dry box and it works brilliantly. The four upright rod holders have been added using stainless steel screws, washers, and lock nuts with some marine sealant to keep it watertight. The rod holders and hardware were purchased from H2o Kayaks. The container is secured to the kayak using a mix of webbing, buckles, and carbine hooks.

The blue box is a Flambeau Waterproof Marine Box, which I use as a tackle box. Secured just behind the seat it is ideal when I need to change tackle.

The kayak came with two flush mounted rod holders. These are positioned behind you and the rods point backwards. I find these of no use when fishing and use them as holders for my net and my priest.
The net is a Greys GS Scoop Net. It has a rubberised mesh which makes it easier to untangle trebles when lure fishing. It is fitted with a lanyard to secure to the kayak and has a short handle, which is ideal. For me it is a must as it is so easy to lose a decent fish close to the kayak particularly Sea Bass who are masters at freeing themselves just when you think you have got them!
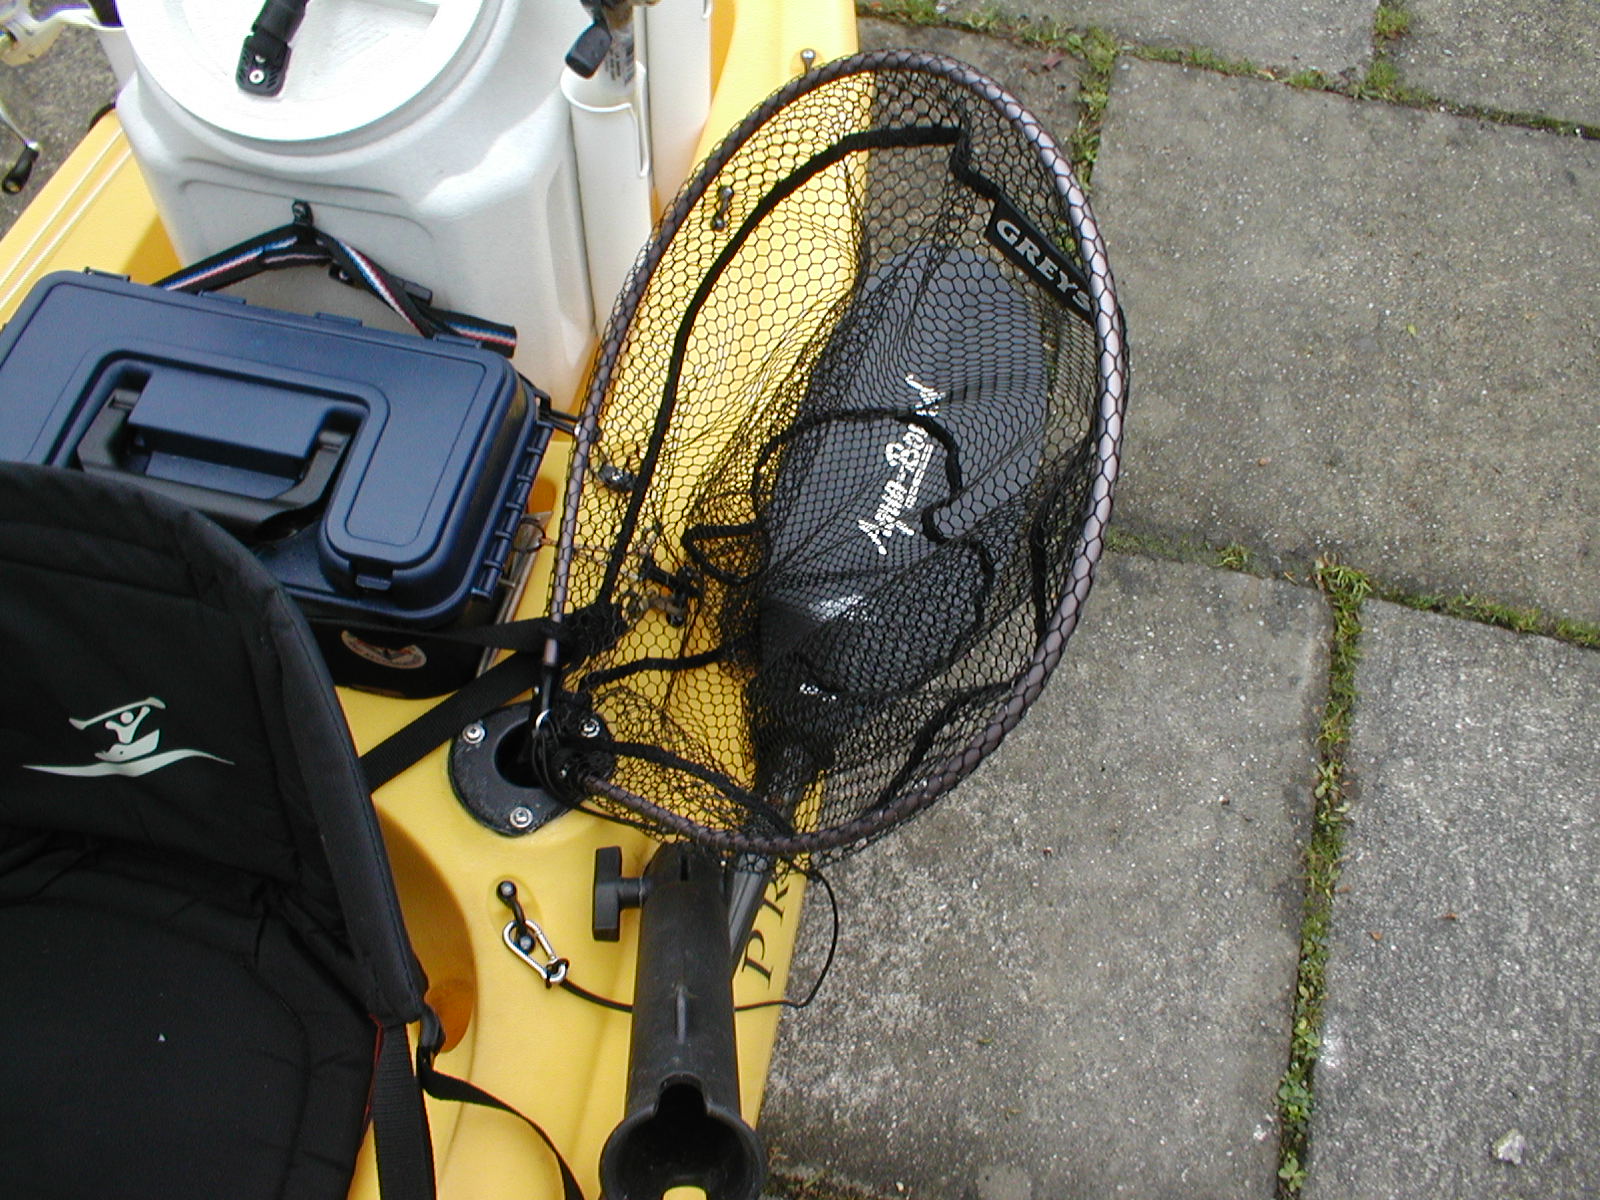
The priest is just a length cut from a thick broom handle. It is marked to various fish size limits. If I decide to take a fish, it is dispatched before the hook is even removed. Personally, I hate seeing fish die gasping for oxygen and much prefer to dispatch them quickly.
Ram Rap-119 Tube Rod Holders are mounted each side within easy access from the seat. I use these when bottom fishing with bait at anchor. I have tried to use these when trolling lures but have found that they slip too easily when a decent fish strikes no matter how tight you clamp the tube onto the ball mount. Research on the Internet suggested roughing the ball up with sandpaper but they still slip with the slightest pressure. I find them OK for holding the rods at anchor but as a precaution from slipping, I secure them to the kayak at an angle with some cord and carbine hooks. This makes sure that should I get a heavy bite the tube will not slip down to horizontal.
For trolling, I use a Scotty Orca Rod Holder with an extender to raise the holder higher. Unlike the Ram tubes, this holder has a ratchet locking mechanism to hold the required angle and the rod is enclosed in the holder. The rod can be quickly pulled out of the holder when you get a take. The holder is positioned in front of me and beyond the forward position of the paddle when paddling yet within easy reaching distance from the seat. This is an excellent rod holder and perfect for trolling.

The Prowler Big Game has a centre hatch which gives access to the inside of the kayak when seated. I use this for storing the anchor, spare paddle and storing the catch. I have two containers for the catch. One is a foldable fish bag for larger fish and the other is a washing up bowl. Both are laden with ice blocks to keep the catch a fresh as possible.

Forward from the centre hatch there is a cockpit tray with moulded in cup holder. This has a strapped down cover and is usually used for housing a bit of tackle and holding a drinks cup. I use the cup holder for my compass and the cover as a bait board. The bait board is just a kitchen chopping board cut to size a secured with nuts and bolts. Using the cup holder for mounting the compass was again something I picked up from another blog.

Along the right side of the kayak is an anchor trolley. The are several videos on You Tube that show how to fit an anchor trolley but basically it is a pulley system that you can operate from your seat enabling you to position the anchor either from the bow or the stern. Unlike a boat, you cannot stand up to drop and secure the anchor hence the need of a pulley system.

I now realise I made a mistake when fitting the anchor trolley pulleys. Following another blog with the same kayak, I used existing pad eyes. Those pad eyes are 56cm from the bow and stern, which is too far. This means that when at anchor or using a drift chute the pull is slightly sideways on causing the kayak to swing more than it would if the anchor was positioned closer the bow or stern. I intend to correct this over the winter by adding some new pad eyes closer to the bow and stern and reposition the pulleys.
The anchor itself consists of a 1.5kg anchor, a meter and a half of anchor chain, an SMB diver's ratchet reel with 60 meters of line, a buoy, a meter and a half of anchor rope, and some carbine hooks.
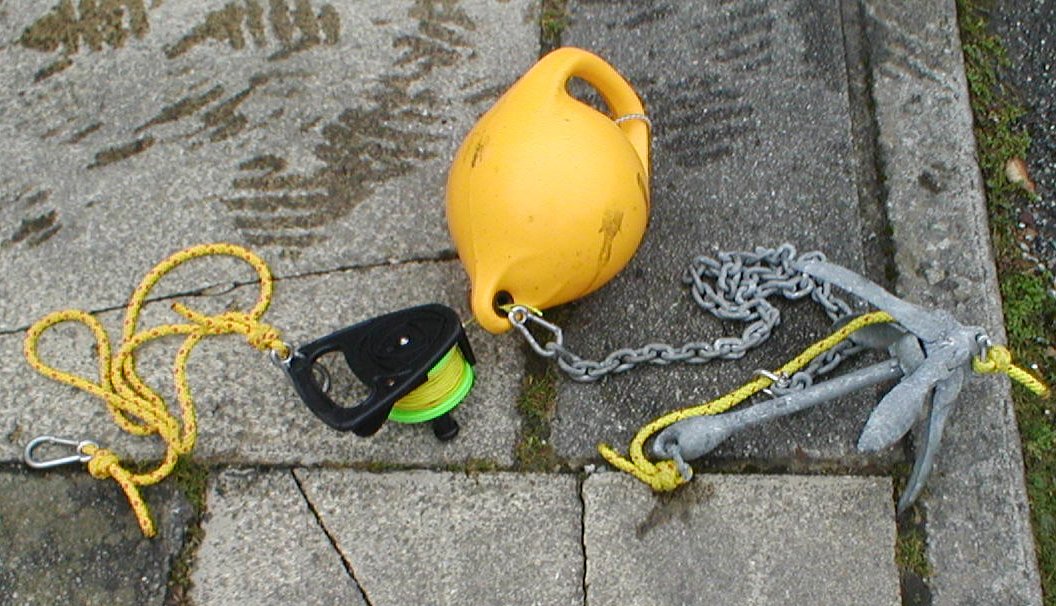
A carbine hook is tied to each end of the anchor rope. One end is for attaching to the anchor trolley the other is permanently clipped to the dive reel. The line from the dive reel is thread through the buoy and tied to another carbine hook which is clipped to the anchor chain which is turn is attached the anchor. When you drop the anchor the ratchet on the dive reel is used to release the line until enough line, (about three times the depth) is out. I mark the ratchet reel line with a permanent marker pen at ten-foot intervals to help determine how much line has been played out. The anchor is positioned at the bow or stern using the anchor trolley and secured by a zigzag cleat. Should I need to, the anchor can be quickly released from the trolley using the carbine hook and collected later. Its position is revealed by the floating buoy.

The majority of the fishing I do is on the drift. One of the best purchases I have made to date has been a drift chute or drogue. This really slows down the drift over a chosen mark giving much more fishing time. The drogue is connected to the anchor trolley and positioned from the bow, the stern, or the middle. Positioning from the bow or stern will slow down the drift even more by turning the kayak into the wind. When casting lures on the drift, I find it particularly useful to position the drogue from the stern. This turns the stern of the kayak into the wind, which means I am facing down wind making it easier to cast the lures down wind.

The paddle I use is an Aqua-Bound Manta Ray Paddle. Due to the width of the Prowler Big Game plus my height, the paddle is 240cm about 20cm longer than the average. This stops me banging the side of the kayak when paddling. The majority of my fishing is drifting over a specific mark, which means constantly having to paddle back up wind/tide to reset the drift therefore, a powerful light paddle is important and the Aqua-Bound Manta Ray fits that criteria.

The rods and reels I use depend on the type of fishing. For casting lures when drifting, I use 7' 10g to 35g spinning rods and 4000 size spinning reels loaded with 20lb braid and a fluorocarbon leader. For vertical jigging, I use 8' 15g to 45g bait-casting rods and Abu bait-casting reels loaded with 30lb braid and a fluorocarbon leader. For vertical jigging with lures up to 50g the bait-casting outfit is excellent because you can jig one handed which is very comfortable. For trolling, I use an 8' 15g to 45g rod with a small multiplier loaded with 15lb nylon line. When bottom fishing with bait I use a couple of 7' 6" 12lb to 20lb boat rods, Abu 6500 multipliers loaded with 15lb nylon and a 30lb nylon leader.
I do not use braid when trolling because when a fish takes a trolling lure the lack of stretch combined with the forward motion of the kayak can pull the lure from the fish's mouth.
Future projects include fitting a fish finder, a GPS and a VHF Radio. The fish finder is not necessarily to find fish but to obtain a reading on depth of water and in particular to identify rough ground. At the moment, I use Google Satellite Maps and lobster pot buoys to find rough ground but it would be nice to know exactly where the rough ground starts and finishes. The GPS would be for marking waypoints of fishing marks and for navigation and the VHF radio for safety.
Update November 2013:
I have now created a kayak fishing set up video (November 2013) shown below.
Below is a sample of a few fish taken in 2012 by either casting lures on the drift, trolling or vertical jigging. All were taken over rough ground.
Update November 2013:
I have now created a kayak fishing set up video (November 2013) shown below.
Below is a sample of a few fish taken in 2012 by either casting lures on the drift, trolling or vertical jigging. All were taken over rough ground.
 |
| 10lb kelp Cod and a couple of Pollack caught jigging over a reef. |
 |
| Another Cod and a surprise John Dory jigging over a reef. |
 |
| Bass caught casting and trolling lures over rough ground. |