I highlighted in a previous post Kayak Fishing Set Up that with experience I realised I positioned my anchor trolley too far from the bow and stern. Rather than fitting new pad eyes, I fitted the pulleys using existing pad eyes, which are 56cm (22") from the bow and stern. This seemed a good idea at the time however, when using the anchor or drift chute I soon realised this caused a problem. The pull was slightly sideways on causing the kayak to swing more in the wind than it should. I decided to rectify the problem by fitting new pad eyes in order to reposition the pulleys and at the same time carry out some modifications.
 |
| Pulley too far from the stern |
Access to the inside of the Ocean Prowler Big Game at the bow is easy due to the front hatch however; I had no access to the inside at the stern. The plan was to fit the new pad eye at the bow using stainless steel screws nuts and washers and at the stern using rivets. I purchased the following hardware:
New Pad Eyes
Rivets
Rivet Gun
Stainless Steel Screws Washers and Nuts
10m of 5mm cord

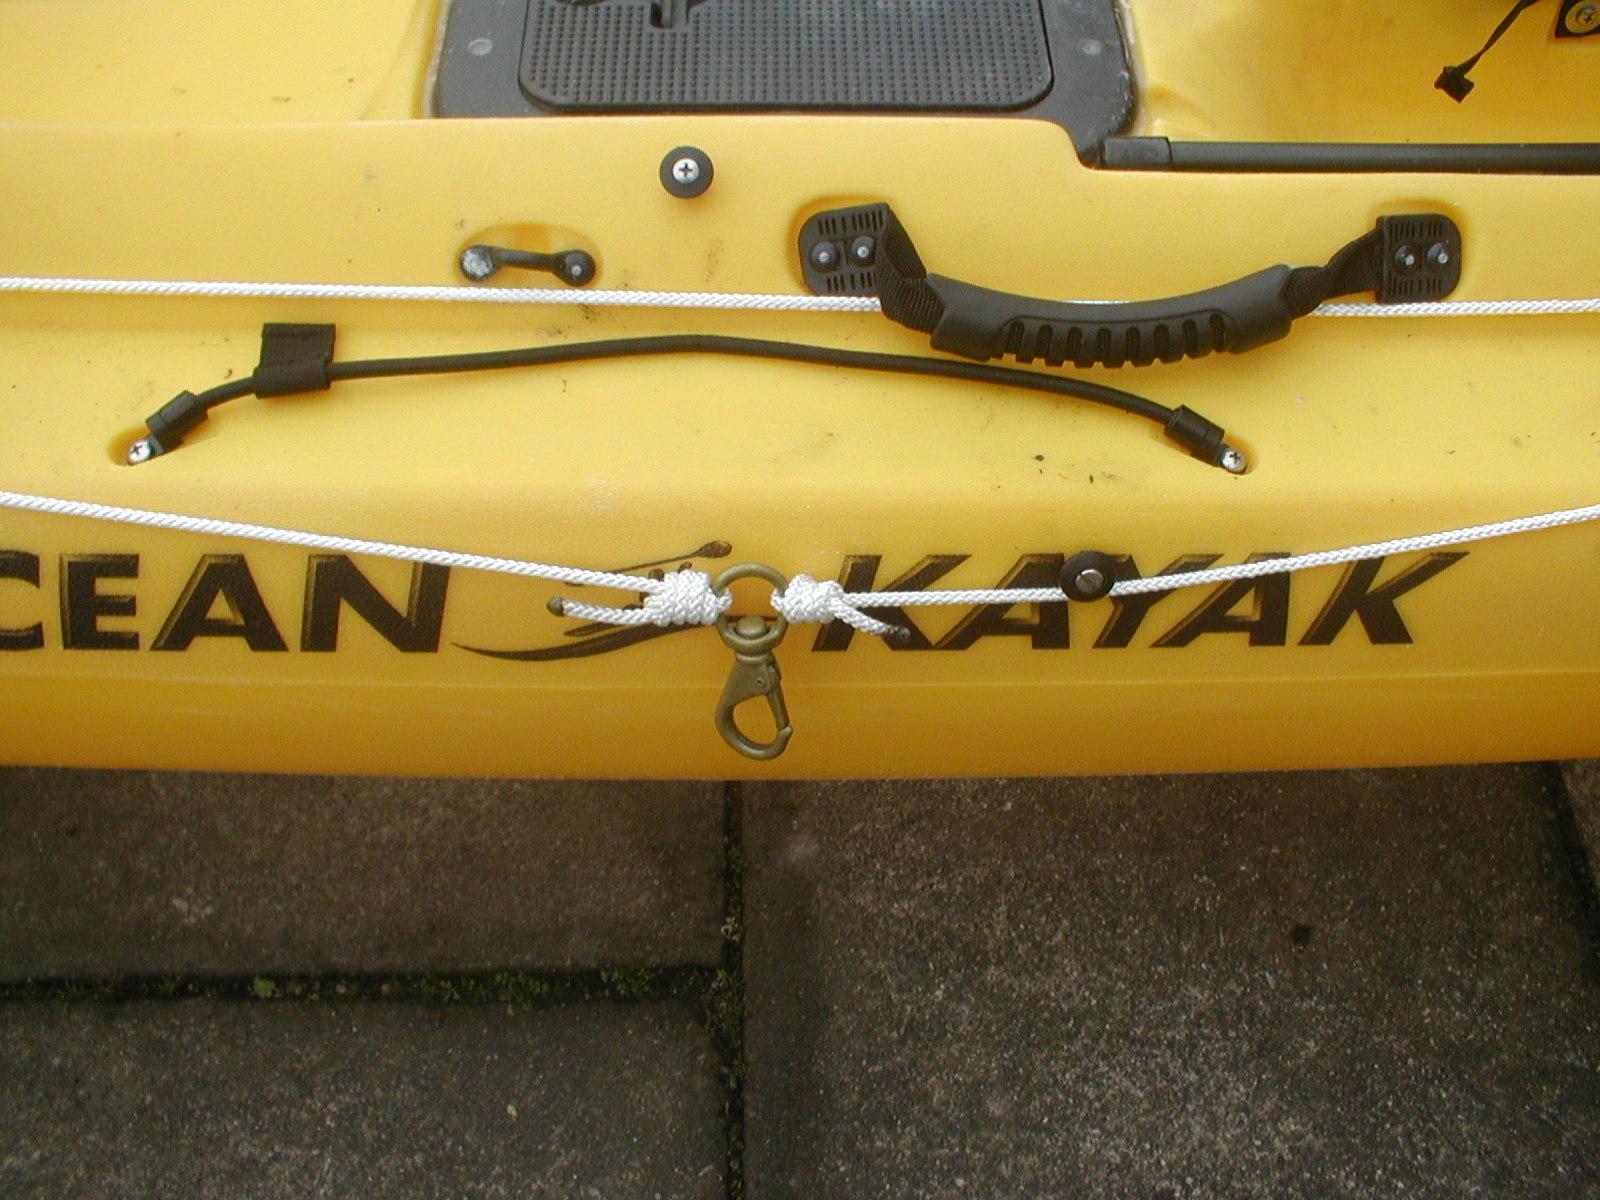
I removed the existing anchor trolley consisting of two stainless steel pulleys, two pieces of bungee cord and a swivel eye snap.
I have always felt that the ideal position for the kayak anchor trolley would be along the vertical side of the kayak however, to achieve this would mean drilling more holes closer to the water line than I was comfortable with. The Prowler Big Game has a flat surface running all the way along the side where the manufacturer had positioned some existing pad eyes. I decided to carry on using this flat surface for my new pad eyes.
Starting with the bow the first job was to drill two 5mm holes using the pad eyes as a marker.

When fitting accessories using screws and nuts I like to use a backing plate for extra strength. This is simply cut from a nylon kitchen chopping board to the appropriate size. Holes are then drilled to correspond with the holes drilled through the kayak.
Using plenty of marine sealant the new pad eye is fitted and secured with the stainless steel screws, backing plate, washers, and nuts.

Next two 5mm holes are drilled at the stern again using the pad eye as a marker. The first rivet is dipped in marine sealant with more marine sealant spread on the pad eye. The rivet is then pushed through the pad eye and drilled hole then fixed using the rivet gun. The process is repeated with the second rivet.

On my previous set up, I attached the pulleys to the pad eyes using short pieces of bungee cord, which is a standard set up. The bungee cord is used to add some stretch to the line. When the kayak rises and falls with the swell the stretch will make anchoring more comfortable and help to prevent the anchor being pulled free. I have never been happy with this type of set up and decided to use carbine hooks instead. The bungee cord will be dealt with later.

I removed the existing anchor trolley consisting of two stainless steel pulleys, two pieces of bungee cord and a swivel eye snap.
I have always felt that the ideal position for the kayak anchor trolley would be along the vertical side of the kayak however, to achieve this would mean drilling more holes closer to the water line than I was comfortable with. The Prowler Big Game has a flat surface running all the way along the side where the manufacturer had positioned some existing pad eyes. I decided to carry on using this flat surface for my new pad eyes.
Starting with the bow the first job was to drill two 5mm holes using the pad eyes as a marker.

When fitting accessories using screws and nuts I like to use a backing plate for extra strength. This is simply cut from a nylon kitchen chopping board to the appropriate size. Holes are then drilled to correspond with the holes drilled through the kayak.
 |
| Backing Plate |
Using plenty of marine sealant the new pad eye is fitted and secured with the stainless steel screws, backing plate, washers, and nuts.

 |
| Inside the bow showing the backing plate |
Next two 5mm holes are drilled at the stern again using the pad eye as a marker. The first rivet is dipped in marine sealant with more marine sealant spread on the pad eye. The rivet is then pushed through the pad eye and drilled hole then fixed using the rivet gun. The process is repeated with the second rivet.

On my previous set up, I attached the pulleys to the pad eyes using short pieces of bungee cord, which is a standard set up. The bungee cord is used to add some stretch to the line. When the kayak rises and falls with the swell the stretch will make anchoring more comfortable and help to prevent the anchor being pulled free. I have never been happy with this type of set up and decided to use carbine hooks instead. The bungee cord will be dealt with later.

Because the anchor trolley cord will now run all the way from the bow to the stern, it will have more of a tendency to cut across the cockpit area following its natural straight path.

I have existing guides for the upper cord that prevents this but nothing for the lower cord. The lower cord could be run below the ball of the ram rod holder and the cleat however; I decided to fit a deck fitting at the widest point to act as a hook and guide.

Next step was to attach the cord. Starting with the bow one end of the cord is thread through the pulley from the bottom up then through existing guides and down through the pulley at the stern. It is then tied to one end of the swivel eye snap. The other end of the cord is then tied to the other end of the swivel eye snap. I find that when using a drift chute the swivel eye snap helps reduce twisting of the drift chute line.

As an alternative to attaching a piece of bungee cord to the anchor trolley I decided to make it part of the anchor system and attached a short piece to the anchor rope. Bungee cord is very strong and more than strong enough to cope with the tide in the areas I fish. This will give me the stretch needed to make anchoring more comfortable. When retrieving the anchor the pull would be on the anchor rope and SMB reel line not on the bungee cord.
The final step was to burn the tag ends of the cord and bungee to prevent fraying.
The anchor or drift chute can now be positioned much closer to the bow or stern and should work much better.

I have existing guides for the upper cord that prevents this but nothing for the lower cord. The lower cord could be run below the ball of the ram rod holder and the cleat however; I decided to fit a deck fitting at the widest point to act as a hook and guide.

Next step was to attach the cord. Starting with the bow one end of the cord is thread through the pulley from the bottom up then through existing guides and down through the pulley at the stern. It is then tied to one end of the swivel eye snap. The other end of the cord is then tied to the other end of the swivel eye snap. I find that when using a drift chute the swivel eye snap helps reduce twisting of the drift chute line.
As an alternative to attaching a piece of bungee cord to the anchor trolley I decided to make it part of the anchor system and attached a short piece to the anchor rope. Bungee cord is very strong and more than strong enough to cope with the tide in the areas I fish. This will give me the stretch needed to make anchoring more comfortable. When retrieving the anchor the pull would be on the anchor rope and SMB reel line not on the bungee cord.
 |
| Anchor system with the addition of a short piece of bungee cord. |
The final step was to burn the tag ends of the cord and bungee to prevent fraying.
The anchor or drift chute can now be positioned much closer to the bow or stern and should work much better.
Hi Rob, I hope I've got the right man, it's Mark from Caerhays. If so, I'm now the proud owner of a Malibu two xl and I can't wait to get out.
ReplyDeleteHello Mark, great to hear from you and pleased that you have your kayak. We will have to get together for a trip sometime this year. You can contact me in person via the contact link at the top of the page. Any help you need let me know.
Delete